Sunday, December 25, 2022

Merry Christmas - And an Oldie But Goodie Freebie Project to Knit

 Hello, dear fellow knitters, and Merry, Merry Christmas!  

Over the years, since I've been teaching machine knitting online, I've got to know quite a few of you.  You are very important to me. 

I do hope you are having an absolutely beautiful holiday and that your heart is filled with the hope, love and peace Jesus provides. If for some reason you're experiencing difficulty, discouragement, or illness, please email me so I could pray for you?   (Email me by clicking on the envelope icon down the left side of this blog).  

We knitters need to stick together and encourage one another.

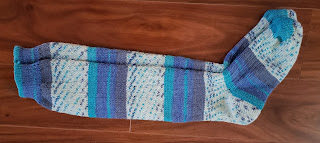
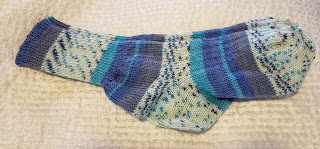
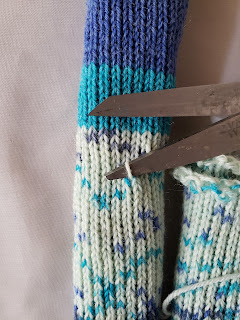
I'd like to give you a Christmas present, and I wondered what I could do for everyone.  Why not repost a cool old pattern that's a little tricky to find?  So, here's an an oldie but goodie machine knitting pattern for a sew as you go gym-length sock.  Knitters get a lot of requests for socks, and here's a pattern you can make on the simples single bed machine.  It's a great opportunity to tune up your sew as you go skills!

First the old video (sorry, made with the older technology) for the technique:


And here's a written pattern for a womens' medium gym sock:

Sew-As-You-Go Single Bed Sock

By Diana Sullivan

© Diana L. Sullivan All Rights Reserved

This pattern makes a low-rise gym sock, which barely shows under an athletic shoe. Instructions are for a women’s medium.

Click here for the instructional video

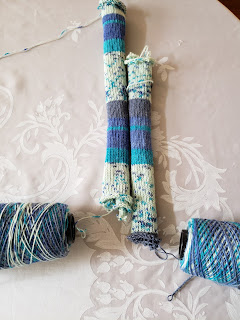
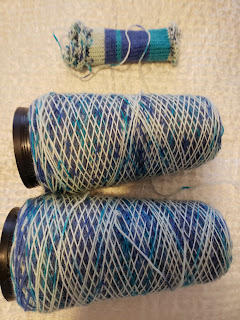
Yarn: Use a good quality sock weight yarn.

Gauge: 8 stitches and 9.25 rows to an inch, or 34 sts and 38 rows to 4” (10 centimenters) I was using tension 6.2 on my machine to get the gauge, but you need the tension setting that gives you the gauge on your machine with your yarn.

Machine: Any standard gauge Japanese flat bed knitting machine, no ribber required
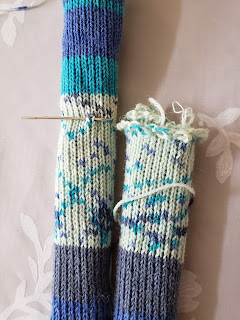
Mock Rib Hem

Tension 3 tensions tighter than garment tension.

Arrange needles for a 2 x 1 mock ribbing arrangement from needle #L16 through needle #R16. That is, put two needles into working position, and leave one back, across those needles. Knit a few rows of waste yarn and a row with ravel cord.

Change to main yarn and knit 20 rows. Pick up the hem, filling in the empty needles. All the needles are in work now, 32 sts.

Back of Ankle

Turn to the regular tension, which gives the gauge for the sock. Knit 20 rows.

Back of Heel

Short row shaping – decrease one stitch at the beginning of every row until only 11 stitches remain in work. Wrapping to prevent a hole (see the video), increase 1 stitch every row until all stitches are in work again.

Bottom of Foot

Knit 40 rows.

Toe

Short row shaping, just like heel. Decrease one stitch at the beginning of every row until only 11 stitches remain in work. Wrapping to prevent a hole (see the video), increase 1 stitch every row until all stitches are in work again.

Top of Foot and Front of Ankle

Knit, doing sew-as-you-go pickup of 1 loop on side opposite carriage every row. Watch the video to see exactly how to do the sew-as-you-go join. Knit until you are all the way back to the mock rib hem.

Final Mock Rib Hem (Ankle front)

Following the video, sew off every third stitch onto a piece of waste yarn. Move those unused needles out of work. Turn the tension to the tighter tension for the mock rib hem. Knit 20 rows. Pick up the stitches from the waste yarn and put them on the out of work needles. Pick up the remaining stitches. Cut the yarn and sew the hem off as shown in the video, OR cast off.


Monday, December 5, 2022

New Book, Video, and YouTube - Teddy Bear Wardrobe

I think you'll get a kick out of this if you have children in your life who just love teddy bears, especially Build a Bears.

Kids love to dress them.  Last year, I helped with a charity project to help dress a LOT of them, and after getting the patterns just right, I created a new book and DVD set.  

These patterns include a dress, Mary Jane "show" which is really a slipper, Tam hat with and without ear holes, top-down raglan sweater with cables or Fair Isle, poncho and also a sewing pattern for trousers, complete with the tail hole.

This is a terrific teaching set.  If you want to teach a beginner, why not do it with small projects?  Or maybe you'd just like to finally get the hang of top-down raglans or round tams?

The video shows how to make the poncho.  Here are lots of great techniques in one video,.  This project is sideways knitted.  It has hems at both the bottom and the top, and they match.  It has an extra-easy neckline.  It has self-made fringe, and on this one you can learn to lock the fringe in place so it doesn't unravel where the fabric begins.  

'Nuff said, here's the video:

Sunday, November 6, 2022

TWO New Videos

 I just put up two new videos for November.  I usually do one a month, but I wanted to let people know about my digital pattern for a Mukluk in 3 gauges and 12 sizes in time for holiday knitting.

Here is the Mukluk video, which shows me knitting a child's size mukluk.  


And here is my regular monthly video, a pile knitted slouch hat.  This is warm, but keep in mind that this stitch is a bit fragile.  It's okay for a hat if you're careful, but much too easily snagged for something like a mitten or a pillow top.  

If anyone knows how to thoroughly lock the stitch, would you clue me in?  I think it is super cute and you might really enjoy making and wearing this:

Thursday, June 16, 2022

June Video - Pile (Loopy) Knitting on a Brother with Ribber

If you've never played with loopy knitting, that is, pile knitting, why not give it a try?  Here's a video where I show how to do it using a Brother bulky machine with ribber:


Sunday, May 8, 2022

New Video for May - Reversible Double Jacquard

This is one of my favorite ribber techniques, and I hope you will try it!  

You can create a double-thickness, fancy two-color pattern that is beautiful on both sides.  It's like a photo negative in that the background color on one side becomes the foreground color on the other side.  

Many of us have done this in hand knitting, and it's quite an exercise in counting stitches.  I used to try hand-counting it on the knitting machine, and I did not have the patience to do it.  However, using the patterning capability of a Brother machine with a ribber, you can use the machine-selected needles as a guide to hand-count the needles on the ribber.

'Nuff said - more easily seen than explained...


And also, Happy Mother's Day!


Wednesday, April 6, 2022

Slipper Bottoms from The Knitting Closet

 I wore my own mukluks so often this winter! It's cold underfoot where we usually sit at our breakfast table with our laptops, because we have a tile floor. I just like to have my feet quite warm. (People do ask for this pattern - it was part of my Strings to Things seminar, and it was based on the lined slipper in Footnotes. it isn't published separately from that USB at this time. I may do it later, but it's not done yet.)

I realized I was going to wear through the slippers, and before that happens, I wanted to put some sort of sole on them.

I purchased these suede heels and toes from theknittingcloset.com. I used some black yarn that has nylon on it to stitch them onto the slipper. The soles came with some black yarn for sewing, but I used my yarn instead because I knew it would be strong. I used two strands and I pulled it through with a rubber "finger cot," one of those gummy thimbles people use in offices. I bought a box of them years ago, and they've lasted all this time and still grip a needle.

So here's my review: They're nicely non-slip. My soles were size "large," and I have a size 8 foot. Large was a good choice since these mukluks are Group 4 yarn and lined with Group 4 yarn, therefore, they're not small foot bottoms. The suede pieces are pre-punched, but the holes aren't very big, so expect to tug. It was easy to keep them in position with just a couple sewing pins, since you can slip pins into the holes.
My only real complaint is I wish they'd come with gray yarn to match.

Standing in them, I can feel them a little, but it's not an issue since my slippers are double-thickness. You would certainly feel them through a thin slipper.


Saturday, April 2, 2022

New Video Today - Hand Painting a Sock Blank Using KoolAid

 I have a new YouTube video today - I did this a while back, and it was so much fun and turned out so well! Great activity for kids who are cooped up...hand painting a sock blank with Kool Aid.

While I realize this is a childlike approach to dyeing, I love working wih Kool Aid. It smells good, it isn't toxic and doesn't require special pots and implements, it's inexpensive, and it is amazingly colorfast.
The downsides are the colors are limited and the purple is a disappointment (to me - I know other people like it). You can get strong colors by using more Kool Aid.

Wednesday, March 9, 2022

Easy Way to Match a "One Way" Self-Striping Sock Yarn

This last week, I'd been making knee socks.  I posted a photo the first pair, in rose colors.  This was a so-so yarn quality but I bought it because the colors were so pretty.

Next, I tried some gorgeous high-end yarn, which came on a hank.  I weighed it, weighed my finished knee socks, rewound the good stuff on a cone, and started knitting a pair of knee socks.  I ran out of yarn before I finished the second sock. I was pretty grumbly about losing a game of "yarn chicken."  I can't get more - it was a gift and hand-dyed besides.

Not wanting to abandon the beautiful yarn as a UFO, I unraveled it and knitted ordinary short socks. I have a little left, and I'll think of something to do with the leftover sock yarn.  

Then I got into some 100-gram skeins of Sale Sock from Yarn Paradise.  I wasn't sure about quality, but I bought it because it was such pretty colors.  The yardage was good, and I got two pairs of socks out of two skeins - a pair of knee socks and a pair of regular socks.  I matched these by finding a place where the color changed, starting there, and then starting there on the second sock.  After making the knee socks first, it was easy to match the regular socks since I just started on the yarn where the knee socks ended.  I only had a very small amount of leftovers, some of it from where I started a ways into the yarn to make that second sock match.


I am really happy with this yarn, even though it was inexpensive (for sock yarn...sigh - it's not unusual to spend $20 or more for one pair's worth of really nice yarn).  This was soft and knitted beautifully in my antique CSM.  

But notice - this is a "one way" striping pattern.  It is not the same right-side up and upside-down.  It seems like most of the sock yarn I get is "one way."  I rewound my yarn twice, waxing it as I went, to eliminate any knots and tangles.  If I rewound one skein once and the other one twice, the patterns would not match - one pattern would be upside-down!

Once I visited my mom and she had a beautiful piece of plaid fabric and a pattern to make my little sister a 4-gore bias skirt.  She was puzzling over how to make that plaid match.   Mom showed me how the fabric was "one way" both vertically and horizontally.  It was a woven-in plaid, not a printed one, and after a whole lot of fiddling, we finally got a beautiful match by flipping the fabric upside-down and cutting out half of the pieces that way.  But I digress...  

Back to my current sock puzzle:  I still had two skeins of this blue print sock yarn, and they didn't start all that close to the same place in the one-way design.  I tried winding off yarn and looking for a spot that matched, but it was annoying - this is such a long repeat!  I wanted an easier, but accurate way to do it.

I came up with what I think is an efficient, easy way to make your socks match, and I want to share it.

Step One:  Wind cones or cakes of both skeins of yarn.  If you do cakes, leave the plastic centers in the yarn.  Not rewinding yarn for machine knitting is just asking for trouble anyway.  Always rewind your yarn!

Step Two:  Using the flatbed knitting machine and 60 needles, make enough rows to knit an entire repeat and a little more.  Remove the cone and the sample without cutting the yarn.  Do this with each skein.  Here's what I had at this point:


This was very fast and easy.  What you see in the picture is the beginning of the knit pieces at the top and the rest of the cone, unused, at the bottom.  

I put them on a table and lined them up, matching the knit design.  

Step Three:  Mark the place where I need to cut the yarn to get two matching cones.

Step Four:  Cut the yarn at that spot.  Why?  Well, you can't just unwind this from here - the top of the photo is the cast-on edge of the yarn.

Step 5:  Take a cone, push it back on the winder, and wind to unravel the stuff previously knitted up and wind it onto the cone, then do the same thing with the second cone.  This is also fast and easy.  Here's what I have:

This is two cones of yarn that should match very nicely.  The little piece is leftover, but I will probably need it for the second pair of socks.  By leaving it knitted, I'll be able to see how it will work in to where I run out, and using it plus my other skimpy little leftovers, I can probably create another matched pair. 

I am so happy with this approach!  Next time I work with unfamiliar self-striping yarn, I'll definitely do this again.  First of all, I can see at a glance how often it repeats, what it looks like, and whether the stripes are accurate and it can be matched.

I didn't knit my preview pieces on my antique CSM because mine has a closed yarn feeder, and I didn't want to cut the yarn more than necessary.  This was extremely quick to knit on the flatbed.


Cranked a Pair of Socks Today


Edit
Add Photos/Videos
Add to your post
This can't be combined with what you've already added to your post.