For a while now, I've been corresponding with an entrepreneur who is developing a new product and company. They make pre-knitted sweater kits that you simply sew together. I can certainly see this as a great way to work on your finishing skills, for instance.
Their website is up! It's here:
http://www.ideasfromthemaster.com/#!blank/c1dxp
Go have a look!
Thursday, January 14, 2016


Tuesday, January 12, 2016
New Website for Knit Natters (Austin Area Machine Knitting Club)
The Knit Natters machine knitting club, which is the club I attend (almost every month; I'm there and helping unless I'm on the road), has a very out-of-date website. I just haven't been able to maintain it the last few years. It's on an old, basic html-based platform and somebody has to work in that way to update it. It takes me a long time to update it and fix things.
Yesterday, when we met, the ladies wanted to catch that thing up. Nobody wanted to fiddle with the html (see, I'm not the only one). So - Norma has a new blog for our club, here: http://knitnatters.blogspot.com.
Norma is posting club pix, patterns, tips, and other share-able items from the club. She's also posting meeting announcements and the like. She's just begun, but there will be more material as time goes by.
Our club is having a baby hat knit-in in May; these items will go to a local charity that makes baskets for needy new moms. We also are planning to have a seminar that I'll lead in August, and I hope to get some of the other local knitters to demo some of their best stuff (because the club has seen most of my stuff). Non-members are welcome. We also have a Yahoo group, knitnatters, that we use to communicate with our members, and we have people in that group who are not local and unable to attend.
We are planning a seminar for the spring of 2017, and we will bring in an outside teacher. I will provide details as I know more.
Also - any Passap knitters out there? Barbara, my really, really good friend and favorite Passap maven, teaches Passap E6000 lessons at almost every meeting. Our club is one of the few that has a Japanese machine demo and a Swiss machine demo at nearly every meeting.
Yesterday, when we met, the ladies wanted to catch that thing up. Nobody wanted to fiddle with the html (see, I'm not the only one). So - Norma has a new blog for our club, here: http://knitnatters.blogspot.com.
Norma is posting club pix, patterns, tips, and other share-able items from the club. She's also posting meeting announcements and the like. She's just begun, but there will be more material as time goes by.
Our club is having a baby hat knit-in in May; these items will go to a local charity that makes baskets for needy new moms. We also are planning to have a seminar that I'll lead in August, and I hope to get some of the other local knitters to demo some of their best stuff (because the club has seen most of my stuff). Non-members are welcome. We also have a Yahoo group, knitnatters, that we use to communicate with our members, and we have people in that group who are not local and unable to attend.
We are planning a seminar for the spring of 2017, and we will bring in an outside teacher. I will provide details as I know more.
Also - any Passap knitters out there? Barbara, my really, really good friend and favorite Passap maven, teaches Passap E6000 lessons at almost every meeting. Our club is one of the few that has a Japanese machine demo and a Swiss machine demo at nearly every meeting.
Sunday, January 10, 2016
Written Directions for the Double English Rib Cloche Hat
The YouTube video showing how to do this fluffy little hat is here:
https://www.youtube.com/watch?v=gnweT_YrY-Q
 While you're over there, you know you can subscribe to my YouTube channel and get notified of any new videos?
Now, here's the written pattern. Keep in mind that this uses sport-weight yarn on a bulky machine with a ribber. Most of the hat is ribbed, so it's not a beginner pattern, but hopefully with the video and written instructions, you'll find it a successful project.
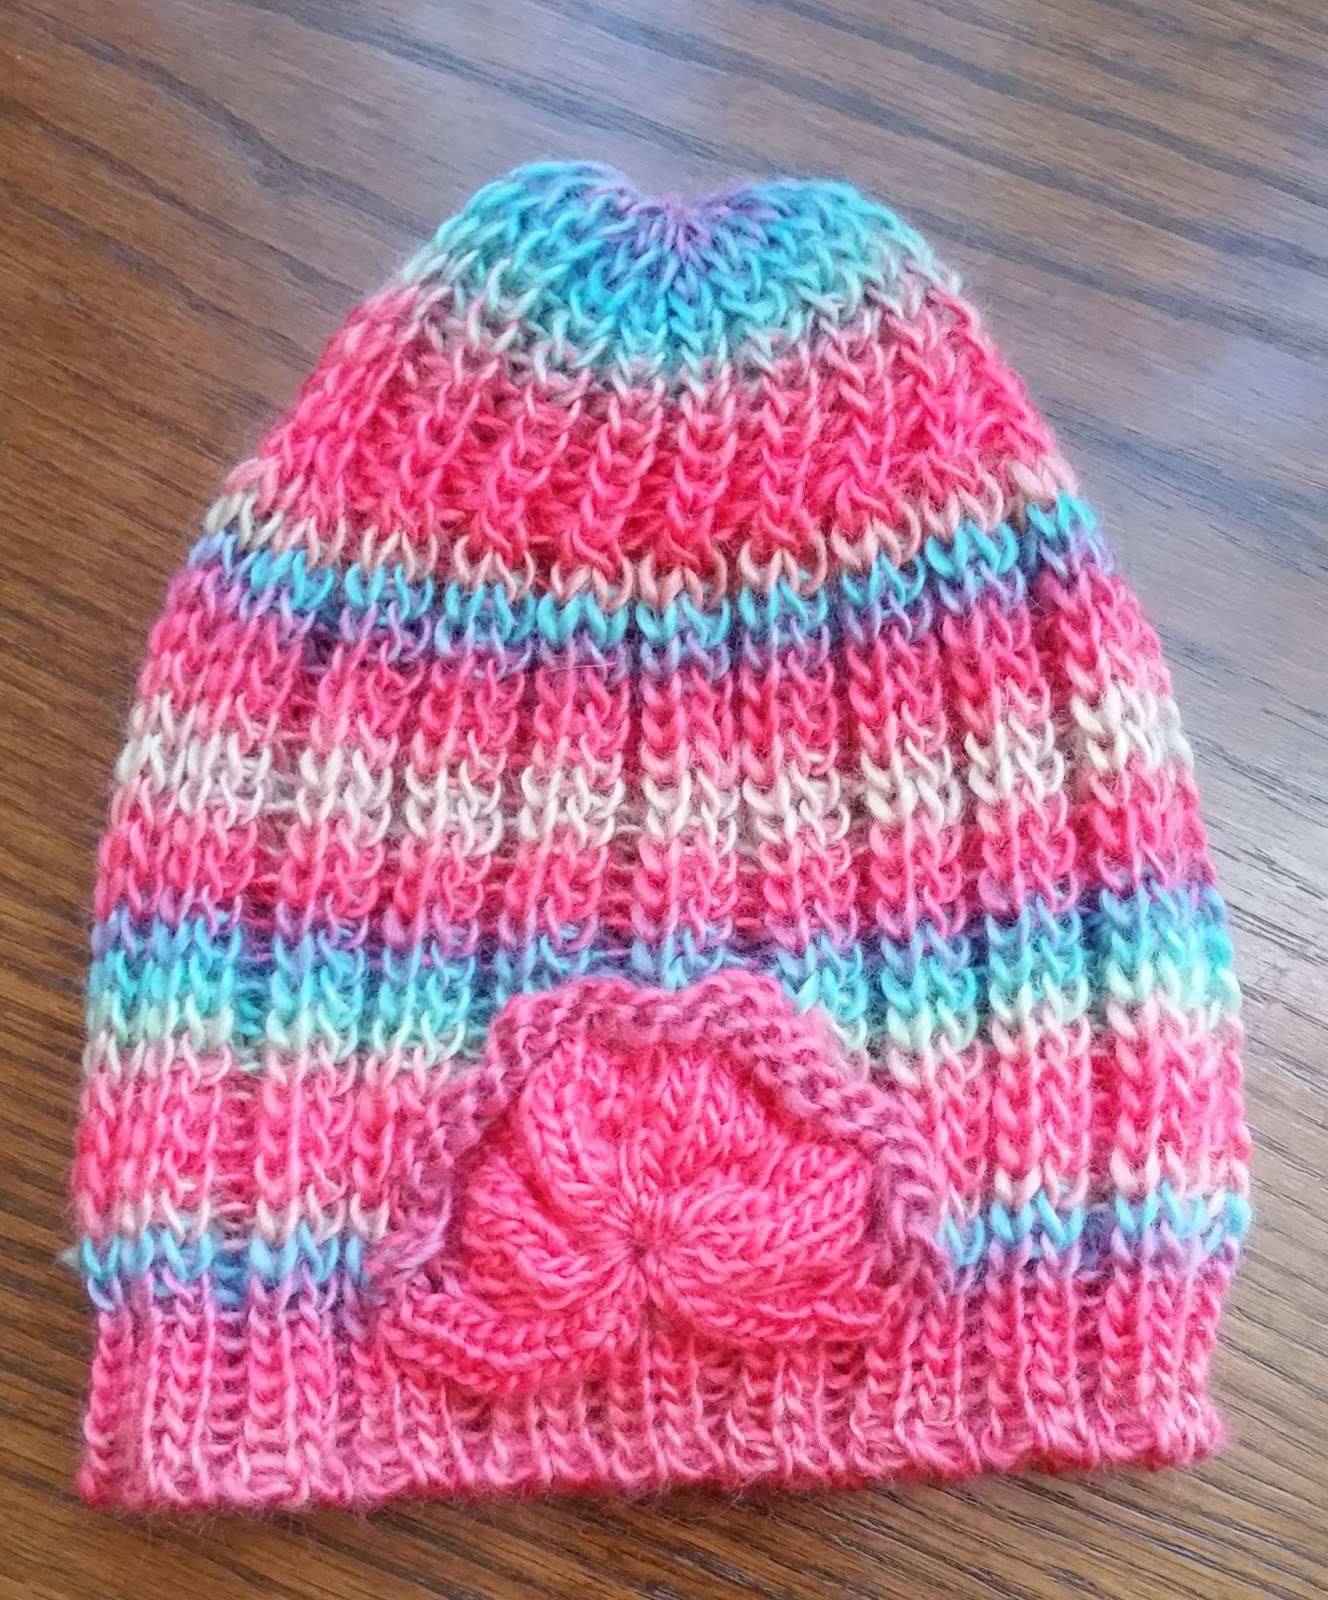
By the way, I've decided I like the flower best if it's not sewn into a circle, as shown in this photo.
This picture is of the hat I knitted as I demonstrated at the club meeting yesterday. The yarn is Red Heart Boutique Unforgettable, and I can get two adult-sized hats out of one ball.
https://www.youtube.com/watch?v=gnweT_YrY-Q
 While you're over there, you know you can subscribe to my YouTube channel and get notified of any new videos?
 Now, here's the written pattern. Keep in mind that this uses sport-weight yarn on a bulky machine with a ribber. Most of the hat is ribbed, so it's not a beginner pattern, but hopefully with the video and written instructions, you'll find it a successful project.
By the way, I've decided I like the flower best if it's not sewn into a circle, as shown in this photo.
This picture is of the hat I knitted as I demonstrated at the club meeting yesterday. The yarn is Red Heart Boutique Unforgettable, and I can get two adult-sized hats out of one ball.
Double English Rib Cloche Hat
By Diana Sullivan
This was knitted with sport weight acrylic yarn (I was quite
happy with Bernat Baby Softee) on a Brother bulky machine.
Flower
Embellishment: E-wrap over 27
needles. Hang comb and two weights. Tension 3. Knit 2 rows.
Set carriage to H setting, so it will slip any held
needles. Working from one end, bring the
4th needle into hold (3 needles in work on end), *then skip 4
needles and bring out the 5th needle, skip 4, next in hold, on
across. You should end up with 3 in work
at the far end.
Knit 4 rows. Put
needles in hold into upper working position and knit one row. Bring same needles into hold as before, knit
4 rows. Push those back, knit 1
row. Repeat that again, bringing same
needles into hold, knitting 4 rows, and putting them partway back and knit 1
row. Cut yarn, leaving a tail for
sewing. Sew the stitches off onto that
yarn.
Gather up the flower.
Seam the open side, or leave it open, your choice.
Hat: Put ribber into position. Set up for 2x2 industrial ribbing as
follows: Starting with needle #31 on the
right, on main bed, bring out 2 needles, then leave one needle out of work,
over to #31 on the left. End needles will
be on the main bed.
Make sure the ribber is racked to the center and is on half
pitch. First needle on the end is the
needle in between the needles on the main bed, and the needles to bring out are
a group of 2, then leave one out of work, across, ending with a single needle
between the last two main bed needles.
End needles on ribber at #31 left and #30 right.
Knit zigzag row at tightest tension. Hang comb and 3 heavy (1#) ribber
weights. Set carriages for circular
knitting and tension 1. Knit 3
rows. Cancel circular setting, change to
garment tension #3 on both main bed and ribber.
Transfer end ribber stitch to main bed on left to the main bed.
Set row counter to 000.
Rack 2 clicks to the left to position for industrial rib. Needles on main bed and ribber should come
close but not touch, and there should be two needles between the main bed and
the ribber. Set both carriage for plain
knitting and knit 6 rows of knit 2, purl 2 ribbing.
Set ribber to tuck when knitting to the left only by raising
the left PR lever and sliding the center lever to P. Do this to RC 48. Tighten tension down to 0.2. Transfer each left needle in main bed groups
onto neighboring needle to the right.
Transfer each left needle in the ribber groups and put those onto their
needle to the right. Double-check that
all out-of-work needles are back out of work and that the needle arrangement is
good.
This sets you up to do regular English Rib. Knit 20 rows.
Take the knitting off on waste yarn and run the garment yarn through the
stitches of the last row to gather the stitches. Gather the stitches for the crown of the hat,
sew the side seam, and tack on the flower.
Child-Size Hat: I
made a child’s hat with 17 groups of 2 needles on the main bed. I knitted 6 rows for the cuff, 36 rows of the
double English Rib, and 12 rows of the single English Rib. For the flower embellishment, I used the same
number of stitches but repeated the tuck procedure only twice.
Friday, January 1, 2016
Start the New Year Right - A New Video!
Happy New Year!
First thing I accomplished this year, after sleeping in and having a nice breakfast, was upload a new video. John upgraded our bandwidth, and oh, that made it so easy and fast to do the upload.
 I have a BUNCH of videos ready to go for 2016! This one was my demonstration at Knit Natters recently. I mailed one to our Barbara (John's 90-year-old mom, who rescues animals and is going strong). Barbara likes soft but warm hats for her early morning dog walks, and she said she just loves this one. One went to Steven's girlfriend, as well, and I also sized this down to a child's size for a girlfriend at Knit Natters. (She was planning to make it for a little girl and her doll, and I can't wait to see that.)
A couple hats are pictured here, but somehow in the Christmas hubbub, I didn't photograph the ones I gave away, which were my favorites. I didn't sew the flower into a circle on those, which gives more of a crewel look, and I used an unusual yarn for one of them. If Barbara can email me a photo, I'll share that.
I think that if you stick to a soft yarn, this would make a decent chemo hat, for those of you who collect and knit those patterns. It's fluffy, not flat, feminine and gently warm. I used sport weight yarn on the Brother 270 (bulky).
What fascinates me about this technique is that it's double English rib. That is, do you see how there are TWO needles tucking next to each other? Guess what, you can get away with this!
Now it's 2016, I've got New Year's Day off, and time's a-wasting. I'm going to go knit - hope you can find knitting time, too!
First thing I accomplished this year, after sleeping in and having a nice breakfast, was upload a new video. John upgraded our bandwidth, and oh, that made it so easy and fast to do the upload.
 I have a BUNCH of videos ready to go for 2016! This one was my demonstration at Knit Natters recently. I mailed one to our Barbara (John's 90-year-old mom, who rescues animals and is going strong). Barbara likes soft but warm hats for her early morning dog walks, and she said she just loves this one. One went to Steven's girlfriend, as well, and I also sized this down to a child's size for a girlfriend at Knit Natters. (She was planning to make it for a little girl and her doll, and I can't wait to see that.)
 A couple hats are pictured here, but somehow in the Christmas hubbub, I didn't photograph the ones I gave away, which were my favorites. I didn't sew the flower into a circle on those, which gives more of a crewel look, and I used an unusual yarn for one of them. If Barbara can email me a photo, I'll share that.
I think that if you stick to a soft yarn, this would make a decent chemo hat, for those of you who collect and knit those patterns. It's fluffy, not flat, feminine and gently warm. I used sport weight yarn on the Brother 270 (bulky).
What fascinates me about this technique is that it's double English rib. That is, do you see how there are TWO needles tucking next to each other? Guess what, you can get away with this!
Now it's 2016, I've got New Year's Day off, and time's a-wasting. I'm going to go knit - hope you can find knitting time, too!
Thursday, December 31, 2015
Nedelina's Dressed-Up Circular Baby Blanket

Check out Nedelina's Circular Swirl Baby Blanket variation. She's added some cute crocheted flowers in the center. I really like it. She only has six sections, so perhaps she changed the numbers to make this work. Or, maybe the knitting, which is so stretchy sideways, simply stretches this way.
The YouTube video for my blanket pattern: https://youtu.be/yBje2C9n3Oc
Best Posts of 2015
Happy New Year's Eve! All is well at this house, where we are enjoying a few days off. John and Steven worked on a cool muscle car all day yesterday, and I knitted in the nice, warm knitting room. Then we went to our favorite restaurant for dinner. The car is a long way from finished, so Steven stayed the night and they're going at it again today.
I am very blessed to have this social outlet for my machine knitting obsession, and this was a fun year! Not only did we go on marvelous jaunts to seminars, I persisted in putting up a video each month, which is a great motivational kick in my pants. Some of them were very useful to readers, and some were just ho-hummy things. Selfishly, I won't go into the so-so stuff, but I'll point out the good ones, and mention a couple of other favorite things I found on the web:
I started the year with a video showing how to give your machines a quick clean and oil. Guess what? You probably need to do it again...after every project would be good. Once a month would be good. It only takes a few minutes! How about NOW? http://diananatters.blogspot.com/2015/01/happy-new-year-and-januarys-video-early.html
 In the spring of 2015, when I finally finished "Finishing School," I felt "finished." This was my most difficult project to date, taking me nine months and turning my knitting workroom into a giant heap of chunky samples and my video editing computer into a vast wasteland of outtakes. I wanted it to have a very large amount of information on how to do excellent project assembly, to be meticulously detailed and comprehensible, and to make it MINE. I showed the ways that I do things, which is very often not at all the way other people do things. What I discovered in the actual process was the relentless need to redo sections to make them clear and to struggle to find better ways to explain how the grafts and seams work. Being able to do it is not the same as being about to explain it! The final result was about 4 hours of video (it could have been 20 hours, but who would want that?), more of a reference work than a course. The feedback from knitters has been wonderful. http://diananatters.blogspot.com/2015/03/at-last-knitters-finishing-school-is.html
In June, I linked to another blog that had an explanation of my favorite provisional cast-on. I use this all the time! It's great for hand or machine knitting: https://cutlermac.wordpress.com/2015/06/05/crochet-cast-on-for-hand-and-machine-knitters/
In October, the video I put up (seashell stitch, above) was very popular. This is a very unusual stitch pattern, do-able on almost any flatbed machine, and after you knit it a while, has a rhythm and becomes habit-forming. http://diananatters.blogspot.com/2015/10/new-video-for-october-seashell-stitch.html
September's video, the Slant Lace Circle Scarf, is another don't miss item. If you haven't played with this stitch, you ought to give it a try. It biases tremendously, and that's the whole point. You end up with a trapezoid shape, and self-striping yarn gives you bias stripes. I made several of these scarves, and always get comments when I wear them. One of my scarves was made with a goofy assortment of small leftovers from socks. Oftentimes, scrappy projects just look junky and overly busy, like alphabet soup, to me, but that was one of the best uses I've found to this particular common leftover (my women's medium socks never take a whole ball. Good sock yarn is lovely, a bit expensive, and just too good to waste). http://diananatters.blogspot.com/2015/09/new-video-for-september-slant-lace.html
Well - this was a little nothing of a video, just a quick edging, but folks loved it - an anti-roll edging. http://diananatters.blogspot.com/2015/03/new-video-for-march-super-easy.html I play around with edgings quite a bit, and my first clue that this was a really good one was when my local knit club liked it so much.
Tom updated his whitening formula for yellowed plastic: http://diananatters.blogspot.com/2015/08/look-tom-has-updated-his-machine.html I haven't tried it yet, but Tom says it works even better! It has less ingredients and looks like it would be easier to do. I used his original formula just once and was astonished at how much better the vintage machine we treated looked.
Tomorrow - a sneak peek at the videos for 2016!
I am very blessed to have this social outlet for my machine knitting obsession, and this was a fun year! Not only did we go on marvelous jaunts to seminars, I persisted in putting up a video each month, which is a great motivational kick in my pants. Some of them were very useful to readers, and some were just ho-hummy things. Selfishly, I won't go into the so-so stuff, but I'll point out the good ones, and mention a couple of other favorite things I found on the web:
I started the year with a video showing how to give your machines a quick clean and oil. Guess what? You probably need to do it again...after every project would be good. Once a month would be good. It only takes a few minutes! How about NOW? http://diananatters.blogspot.com/2015/01/happy-new-year-and-januarys-video-early.html
In the spring of 2015, when I finally finished "Finishing School," I felt "finished." This was my most difficult project to date, taking me nine months and turning my knitting workroom into a giant heap of chunky samples and my video editing computer into a vast wasteland of outtakes. I wanted it to have a very large amount of information on how to do excellent project assembly, to be meticulously detailed and comprehensible, and to make it MINE. I showed the ways that I do things, which is very often not at all the way other people do things. What I discovered in the actual process was the relentless need to redo sections to make them clear and to struggle to find better ways to explain how the grafts and seams work. Being able to do it is not the same as being about to explain it! The final result was about 4 hours of video (it could have been 20 hours, but who would want that?), more of a reference work than a course. The feedback from knitters has been wonderful. http://diananatters.blogspot.com/2015/03/at-last-knitters-finishing-school-is.htmlIn June, I linked to another blog that had an explanation of my favorite provisional cast-on. I use this all the time! It's great for hand or machine knitting: https://cutlermac.wordpress.com/2015/06/05/crochet-cast-on-for-hand-and-machine-knitters/
In October, the video I put up (seashell stitch, above) was very popular. This is a very unusual stitch pattern, do-able on almost any flatbed machine, and after you knit it a while, has a rhythm and becomes habit-forming. http://diananatters.blogspot.com/2015/10/new-video-for-october-seashell-stitch.html
September's video, the Slant Lace Circle Scarf, is another don't miss item. If you haven't played with this stitch, you ought to give it a try. It biases tremendously, and that's the whole point. You end up with a trapezoid shape, and self-striping yarn gives you bias stripes. I made several of these scarves, and always get comments when I wear them. One of my scarves was made with a goofy assortment of small leftovers from socks. Oftentimes, scrappy projects just look junky and overly busy, like alphabet soup, to me, but that was one of the best uses I've found to this particular common leftover (my women's medium socks never take a whole ball. Good sock yarn is lovely, a bit expensive, and just too good to waste). http://diananatters.blogspot.com/2015/09/new-video-for-september-slant-lace.html
Well - this was a little nothing of a video, just a quick edging, but folks loved it - an anti-roll edging. http://diananatters.blogspot.com/2015/03/new-video-for-march-super-easy.html I play around with edgings quite a bit, and my first clue that this was a really good one was when my local knit club liked it so much.
Tom updated his whitening formula for yellowed plastic: http://diananatters.blogspot.com/2015/08/look-tom-has-updated-his-machine.html I haven't tried it yet, but Tom says it works even better! It has less ingredients and looks like it would be easier to do. I used his original formula just once and was astonished at how much better the vintage machine we treated looked.
Tomorrow - a sneak peek at the videos for 2016!
Wednesday, December 30, 2015
Have You Seen One of These?
Look at this vintage toy knitting machine over at Yet Another Canadian Artisan:
https://cutlermac.wordpress.com/2016/01/08/look-what-landed-in-my-lap/
I remember these being advertised in the 1960s. I didn't have one...but wanted one, of course. Somehow knitting has just always fascinated me.
https://cutlermac.wordpress.com/2016/01/08/look-what-landed-in-my-lap/
I remember these being advertised in the 1960s. I didn't have one...but wanted one, of course. Somehow knitting has just always fascinated me.
Monday, December 28, 2015
Fascinating Information at Marzipan
Mar has knitted some very cute photo pillows, and she's explained how she did it - with something called Gimp and Design-A-Knit. Go have a look!
http://marzipanknits.blogspot.com/2016/01/bitten-by-gimp-bug.html
http://marzipanknits.blogspot.com/2016/01/bitten-by-gimp-bug.html
Friday, December 25, 2015

Tuesday, December 15, 2015
Saturday, December 12, 2015
Inspiration at Knitting Up A Storm
Every time I start to think that knitted gifts aren't all that cool, I do a bit of shopping and am surprised at how many beautiful items are featured in the stores during the holiday season.
These hand-knit fair isle gift hats are really cute:
http://knitting-up-a-storm.blogspot.com/2015/12/2-at-time-fair-isle-gift-hats.html
If you read the article, you'll see how very long these took to knit. But we're machine knitters, right? One option would be to machine knit most of the hat (and save lots of time), and then take it off and hand knit the shaped crown. Why not learn to shape a crown with the garter bar? Check out how it's done in the golf club cover videos:
https://www.youtube.com/watch?v=9RjVYcV4WQc
https://www.youtube.com/watch?v=RB-Gseewc8Y
This all works best if you can sew a really nice mattress stitch seam. Or, you can make seamless hats with the self-patterning "fair isle" yarn, providing you have a ribbing attachment. See the Tom's Troop Cap videos:
https://www.youtube.com/watch?v=rPBW2eMOVQY
https://www.youtube.com/watch?v=q4F2vZOsx1Y
These hand-knit fair isle gift hats are really cute:
http://knitting-up-a-storm.blogspot.com/2015/12/2-at-time-fair-isle-gift-hats.html
If you read the article, you'll see how very long these took to knit. But we're machine knitters, right? One option would be to machine knit most of the hat (and save lots of time), and then take it off and hand knit the shaped crown. Why not learn to shape a crown with the garter bar? Check out how it's done in the golf club cover videos:
https://www.youtube.com/watch?v=9RjVYcV4WQc
https://www.youtube.com/watch?v=RB-Gseewc8Y
This all works best if you can sew a really nice mattress stitch seam. Or, you can make seamless hats with the self-patterning "fair isle" yarn, providing you have a ribbing attachment. See the Tom's Troop Cap videos:
https://www.youtube.com/watch?v=rPBW2eMOVQY
https://www.youtube.com/watch?v=q4F2vZOsx1Y
Wednesday, December 9, 2015
Inspiration at Rhythm of the Needles - Mitten Garland
Check out this adorable Christmas project:
http://www.rhythmoftheneedles.net/2015/11/christmas-mini-mitten-garland.html
http://www.rhythmoftheneedles.net/2015/11/christmas-mini-mitten-garland.html
Sunday, December 6, 2015
December Videp - Lace Oranment Project
Oh, I know y'all are busy in December! Why, it's nearly madness, the way we run around, and then we wonder why we haven't much holiday spirit left. My blogging is almost nonexistent lately, with all the appointments and obligations I've had.
 Even if you don't have a lot of time, how about treating yourself to a knitting session and making some fun ornaments?
You can do this on a Brother electronic. Rather than go through all the business of starching the lace ornament and having it hollow, I just covered plain, shiny red balls. They don't take very long, and I plan to demonstrate this next weekend at the Knit Natters holiday meeting.
This particular lace fascinates me, because it has double-sized holes - they're two stitches wide! It's very unusual, and it gathers up for an interesting look on top of a Christmas ball. In the YouTube face photo, I'm sewing the lace ornament cover off to gather the top.

You can do this on a Brother electronic. Rather than go through all the business of starching the lace ornament and having it hollow, I just covered plain, shiny red balls. They don't take very long, and I plan to demonstrate this next weekend at the Knit Natters holiday meeting.
This particular lace fascinates me, because it has double-sized holes - they're two stitches wide! It's very unusual, and it gathers up for an interesting look on top of a Christmas ball. In the YouTube face photo, I'm sewing the lace ornament cover off to gather the top.
Thursday, November 26, 2015
Happy Thanksgiving!

At our house, we didn't feel like having turkey or ham, so we ate a non-traditional meal - pork roast, Elgin sausages, garlic potatoes, chocolate pudding, big salads, broccoli, and homemade rolls. With my food plan, I was able to have some of everything but the pudding and homemade rolls, and it was plenty.
Now it's quiet. Steven's watching a game. John's walking the dog. Diana's poking around the net...good times.
I've been knitting quite a lot this week, getting next year's videos for YouTube ready to go. I'm really happy with them, and now my attention goes to the next pattern book. I've been quiet on the blog - just got over a nasty cold, so not much energy for extras for a while. Glad that's out of the way; hope that's it for the winter.
Monday, November 9, 2015
Christmas Stocking Inspiration at Marg's Blog
Check out these beautiful MK stockings:
http://margsknittingplace.blogspot.com/2015/11/christmas-stockings-2015-every-year-our.html
http://margsknittingplace.blogspot.com/2015/11/christmas-stockings-2015-every-year-our.html
Sunday, November 1, 2015
New Video - Add Mock Ribbing at the End of a Knitted Piece
This is fairly simple, really, just a way to add mock ribbing at the end and have the transition from every needle to having some needles out of work look good. It's a great technique for any machine.
Consider subscribing to my YouTube videos, and you'll get an email every time there's a new video!
Saturday, October 17, 2015
Dallas Seminar - Next Weekend! And, machines for sale...
My last 2015 machine knitting seminar is in Dallas near the DFW airport. Anyone looking for information about the upcoming Dallas seminar can look here:
http://www.dfwmachineknitters.com/2015Seminar.html
Next year, I have a spring schedule, and plan to go to Denver, Anaheim, and Albuquerque.
I have some machines for sale. If someone is interested, please contact me through my email. Email me by clicking on the email icon on this blog. Scroll down, and it's on the left, looks like an envelope.
The good news is, my prices are very reasonable for these machines, John cleaned and oiled them, and I inventoried them to make sure they're complete and purchased any missing parts for them. Bad news: we don't want to ship them. They're work to pack and expensive to ship, plus several are multi-box packages. I can bring a machine to sell with me to Dallas, if that's closer for you. I'm in Austin, about 3-1/2 hours south of Dallas.
So here's what I have that's ready right now:
1. A lovely Brother 900 electronic with ribber (and KnitLeader, too, if you want). It's not the most common machine, but I'm actually tempted to keep it, as it's sweet to knit with and easy to program. We gave it a good going-over. It patterns beautifully, has a lace carriage, and the carriage features are the typical Brother ones. It has some stitch designs built in, and you can put in your own with the input keys. It holds stitch patterns up to 24 stitches wide (for instance, you could have a repeat of 17 stitches if you wanted). It has variation keys, including the one for double jacquard. The ribber is the typical modern ribber with lili buttons. The ribber and its accessories are in a plastic Plano shotgun case.
2. A Brother 890 with ribber (and if you want a KnitLeader, that can be arranged). This one is the 24-stitch punch card machine with lace carriage.
3. A Brother 350. This machine is a reliable plastic bed mid-gauge. Patterning is manual, the machine is delightfully portable (I've taken these to fiber fairs and knit club), and it knits very smoothly.
4. Does anybody want a sturdy metal stand? I have a couple extra ones. One tilts, and one doesn't. These are older, but built like tanks.
I have other units that aren't ready yet, most notably, there will be a Brother 970 and its ribber. This is the most advanced Brother electronic machine, and it has a good CB-1 with an original clear display (many of them need new backlights by now). It appears to be in great shape, but I haven't inventoried it for possible missing accessories yet or done the clean and oil job.
One more announcement: My John changes the displays in 970 CB-1 boxes. He has a reasonable price for that, and he also fixes FB100s that need a belt (you might fix that one yourself. I did a video here) and Passap E6000 consoles with dead batteries. Email for details. John's not going to Dallas, but he'll do these at seminars if you let us know so he'll take his tools and parts.
http://www.dfwmachineknitters.com/2015Seminar.html
Next year, I have a spring schedule, and plan to go to Denver, Anaheim, and Albuquerque.
I have some machines for sale. If someone is interested, please contact me through my email. Email me by clicking on the email icon on this blog. Scroll down, and it's on the left, looks like an envelope.
The good news is, my prices are very reasonable for these machines, John cleaned and oiled them, and I inventoried them to make sure they're complete and purchased any missing parts for them. Bad news: we don't want to ship them. They're work to pack and expensive to ship, plus several are multi-box packages. I can bring a machine to sell with me to Dallas, if that's closer for you. I'm in Austin, about 3-1/2 hours south of Dallas.
So here's what I have that's ready right now:
1. A lovely Brother 900 electronic with ribber (and KnitLeader, too, if you want). It's not the most common machine, but I'm actually tempted to keep it, as it's sweet to knit with and easy to program. We gave it a good going-over. It patterns beautifully, has a lace carriage, and the carriage features are the typical Brother ones. It has some stitch designs built in, and you can put in your own with the input keys. It holds stitch patterns up to 24 stitches wide (for instance, you could have a repeat of 17 stitches if you wanted). It has variation keys, including the one for double jacquard. The ribber is the typical modern ribber with lili buttons. The ribber and its accessories are in a plastic Plano shotgun case.
2. A Brother 890 with ribber (and if you want a KnitLeader, that can be arranged). This one is the 24-stitch punch card machine with lace carriage.
3. A Brother 350. This machine is a reliable plastic bed mid-gauge. Patterning is manual, the machine is delightfully portable (I've taken these to fiber fairs and knit club), and it knits very smoothly.
4. Does anybody want a sturdy metal stand? I have a couple extra ones. One tilts, and one doesn't. These are older, but built like tanks.
I have other units that aren't ready yet, most notably, there will be a Brother 970 and its ribber. This is the most advanced Brother electronic machine, and it has a good CB-1 with an original clear display (many of them need new backlights by now). It appears to be in great shape, but I haven't inventoried it for possible missing accessories yet or done the clean and oil job.
One more announcement: My John changes the displays in 970 CB-1 boxes. He has a reasonable price for that, and he also fixes FB100s that need a belt (you might fix that one yourself. I did a video here) and Passap E6000 consoles with dead batteries. Email for details. John's not going to Dallas, but he'll do these at seminars if you let us know so he'll take his tools and parts.
Finding the Right Tension
I had a great emailed question today from a lady who is about to get a new machine. She's already enjoying knitting on a simpler machine (the wonderful, affordable Brother 350), and this nice bulky will make it possible to knit heavier yarns and easily make fancy stitch patterns.
Her question was about what tension to use for Aran yarn. Well, she's in UK, where the REAL Aran yarn is available, but I've certainly hand knit with some good "Aran" yarns, or at least I was told that's what it was...Hmm. Is her stuff like the lighter, softer Aran, or is it like the stiff, hard-twist yarn I used once that was thicker? I don't know. But it got me thinking about this whole tension question, and what I've learned about it over the years.
I mostly learn knitting the hard way. I do what doesn't work, repent, and try something different. And repeat. And gradually, I learn all sorts of details that help me out later. This blog is about having them help you out, too, if you haven't yet fallen into some particular error I've experienced.
To me, tension is all about FEEL. The machine should knit the yarn easily, that is, the carriage should slide smoothly across. The resulting fabric should feel good, not packed tight and not sloppy-loose. This means you have to experiment.
 The "experimental swatch" has a different purpose from the gauge swatch. For this swatch, you knit a row of contrast for a marker, set the tension dial to a possible setting, knit a few rows, make an eyelet for each number of the dial (so later you can see what tension it was), knit maybe 20 rows, knit another marker row, and try another tension setting. You'll feel the difference with your machine. Ironically, sometimes a looser tension (larger stitch size) will be easier to knit and sometimes a tighter one (smaller stitches) will be easier to knit. You're looking for the "sweet spot" for that yarn. Make a note of what tensions were smooth and easy.
See how photographed experimental swatch gets bigger as it was knitted with bigger dial numbers? Note that I made a section for T3. Too tight. T4. A little too tight. T5 - starting to feel good. So, I did a section of T5.1 (see that extra hole) and T5.2. Finally I did a section of T6.
When the experimental swatch comes off the machine, you give it a vertical tug and let it rest. Then, block it in the way you plan to block the garment. You should launder it, too, whatever way you plan to launder the garment. Yarns can grow, shrink, soften, or fall apart in the wash. Even well-behaved yarns can change size by 10-15%.
You go do something different and return to the swatch with Serene Objectivity, then examine each section and decide which tension is best for that yarn. In case Serene Objectivity isn't living at your house that day (she often fails to show up when I need her), show it to a friend or family member and collect an opinion or two.
The best tension will be easy to knit and produce the look and "hand" you want in the fabric.
If you're doing a pattern stitch, do the swatch in pattern.
Warning: If the yarn is miserable to knit, the carriage hard to push, or too scratchy, or too splitty, or whatever, don't use it in your machine. You can damage your machine, or simply end up frustrated with a very disappointing finished project after investing hours of time and handfuls of money. This goes back to the told truism that a cheapo yarn results in a cheapo sweater. Its true nature will come through, despite skilled, meticulous workmanship. I am referring to quality, not price; some expensive yarns can be disappointing just like cheap ones.
Her question was about what tension to use for Aran yarn. Well, she's in UK, where the REAL Aran yarn is available, but I've certainly hand knit with some good "Aran" yarns, or at least I was told that's what it was...Hmm. Is her stuff like the lighter, softer Aran, or is it like the stiff, hard-twist yarn I used once that was thicker? I don't know. But it got me thinking about this whole tension question, and what I've learned about it over the years.
I mostly learn knitting the hard way. I do what doesn't work, repent, and try something different. And repeat. And gradually, I learn all sorts of details that help me out later. This blog is about having them help you out, too, if you haven't yet fallen into some particular error I've experienced.
To me, tension is all about FEEL. The machine should knit the yarn easily, that is, the carriage should slide smoothly across. The resulting fabric should feel good, not packed tight and not sloppy-loose. This means you have to experiment.
 The "experimental swatch" has a different purpose from the gauge swatch. For this swatch, you knit a row of contrast for a marker, set the tension dial to a possible setting, knit a few rows, make an eyelet for each number of the dial (so later you can see what tension it was), knit maybe 20 rows, knit another marker row, and try another tension setting. You'll feel the difference with your machine. Ironically, sometimes a looser tension (larger stitch size) will be easier to knit and sometimes a tighter one (smaller stitches) will be easier to knit. You're looking for the "sweet spot" for that yarn. Make a note of what tensions were smooth and easy.
See how photographed experimental swatch gets bigger as it was knitted with bigger dial numbers? Note that I made a section for T3. Too tight. T4. A little too tight. T5 - starting to feel good. So, I did a section of T5.1 (see that extra hole) and T5.2. Finally I did a section of T6.
When the experimental swatch comes off the machine, you give it a vertical tug and let it rest. Then, block it in the way you plan to block the garment. You should launder it, too, whatever way you plan to launder the garment. Yarns can grow, shrink, soften, or fall apart in the wash. Even well-behaved yarns can change size by 10-15%.
You go do something different and return to the swatch with Serene Objectivity, then examine each section and decide which tension is best for that yarn. In case Serene Objectivity isn't living at your house that day (she often fails to show up when I need her), show it to a friend or family member and collect an opinion or two.
The best tension will be easy to knit and produce the look and "hand" you want in the fabric.
If you're doing a pattern stitch, do the swatch in pattern.
Warning: If the yarn is miserable to knit, the carriage hard to push, or too scratchy, or too splitty, or whatever, don't use it in your machine. You can damage your machine, or simply end up frustrated with a very disappointing finished project after investing hours of time and handfuls of money. This goes back to the told truism that a cheapo yarn results in a cheapo sweater. Its true nature will come through, despite skilled, meticulous workmanship. I am referring to quality, not price; some expensive yarns can be disappointing just like cheap ones.
Sunday, October 11, 2015
Subscribe!
I've just taught a two-day seminar in Princeton, Minnesota (Thank you, Cindy Schmatz and awesome knitters). This was a grand experience. We have beautiful weather here in Minnesota, and we're planning on a nice Sunday drive today. We've already seen some spectacular fall color.
One of the things I've noticed is that a lot of knitters like to keep up to date on my new videos and blog posts, but they miss them. You can subscribe, you know, and be notified of each new video! Go down the left-hand side of this blog to subscribe.
I am still doing a YouTube video every month. This month was an interesting shell stitch. To subscribe to the YouTube videos, and not miss any of them, go here:
https://www.youtube.com/results?search_query=dianaknits
One of the things I've noticed is that a lot of knitters like to keep up to date on my new videos and blog posts, but they miss them. You can subscribe, you know, and be notified of each new video! Go down the left-hand side of this blog to subscribe.
I am still doing a YouTube video every month. This month was an interesting shell stitch. To subscribe to the YouTube videos, and not miss any of them, go here:
https://www.youtube.com/results?search_query=dianaknits
Saturday, October 3, 2015
New Video for October - Seashell Stitch
I had a knitter email, linking a picture and asking about a stitch like this. Then I saw a number of posts about stitches like this on one of the knitting lists. After that, I couldn't get it off my mind. It looked fairly easy; rather like the triangles, argyles and other designs we used to do with short-rowing.
After thinking it over, I decided it would be a good thing for a bulky or mid-gauge in a 12-stitch version. Of course, you could make it on just about any machine, and it would be gorgeous in standard gauge, but I liked the idea of it working up quickly on a bulky.
This morning, I had a chance to play with some ideas. I ended up with a very simple 12-stitch shell, s simplified so you don't have many ends to deal with, you can do a quick, no-wrap short-row, and you don't have to do much counting or mark the needle bed.
You're going to see a very interesting texture - the bottoms of the shells are raised. You can block that into flatness if you want, but after making, oh, at least four swatches today - I decided I like a very light blocking. Also, notice how the variegated yarn makes curves?
After you watch the video, you'll probably realize that this could be done automatically using slip stitches, with an electronic machine that would hold a large enough pattern. However, you'd have to pass the width of the knitting every row, even if it's just a two-stitch row, so it's a job for a motor attached to an electronic machine. I might try it...but not today!
Nope - this weekend, John and I are getting ready to go to Princeton, Minnesota next weekend. I've going to do a two-day seminar, and I've got a very busy curriculum planned! I believe Cindy Schmatz still has some space in that seminar, if you'd like to attend.
After thinking it over, I decided it would be a good thing for a bulky or mid-gauge in a 12-stitch version. Of course, you could make it on just about any machine, and it would be gorgeous in standard gauge, but I liked the idea of it working up quickly on a bulky.
This morning, I had a chance to play with some ideas. I ended up with a very simple 12-stitch shell, s simplified so you don't have many ends to deal with, you can do a quick, no-wrap short-row, and you don't have to do much counting or mark the needle bed.
You're going to see a very interesting texture - the bottoms of the shells are raised. You can block that into flatness if you want, but after making, oh, at least four swatches today - I decided I like a very light blocking. Also, notice how the variegated yarn makes curves?
After you watch the video, you'll probably realize that this could be done automatically using slip stitches, with an electronic machine that would hold a large enough pattern. However, you'd have to pass the width of the knitting every row, even if it's just a two-stitch row, so it's a job for a motor attached to an electronic machine. I might try it...but not today!
Nope - this weekend, John and I are getting ready to go to Princeton, Minnesota next weekend. I've going to do a two-day seminar, and I've got a very busy curriculum planned! I believe Cindy Schmatz still has some space in that seminar, if you'd like to attend.
Subscribe to:
Posts (Atom)

 Posts
Posts


.tif)
